Half Baked Harvest Parker House Rolls: The Ultimate Guide To Making Soft, Fluffy Rolls At Home
Ever wondered how to make those buttery, soft Parker House rolls that you can’t stop eating? Well, here’s the scoop on the famous Half Baked Harvest Parker House Rolls recipe. If you’re a fan of homemade bread or just looking for an easy way to impress your family and friends, this is the perfect place to start. These rolls are like a warm hug in your mouth—fluffy on the inside, golden on the outside, and packed with flavor. Let’s dive in!
You don’t need to be a professional baker to master these Parker House rolls. With Half Baked Harvest’s recipe, you’ll learn the secrets to creating restaurant-quality rolls right in your kitchen. Whether you’re planning a holiday dinner or just want to treat yourself, these rolls are game-changers.
Before we get into the nitty-gritty, let’s set the scene. Picture this: the smell of fresh bread wafting through your home, the sound of dough slapping against the counter, and the satisfaction of pulling perfectly baked rolls out of the oven. Sounds dreamy, right? Stick around, because we’re about to show you how it’s done!
Read also:Clever Coyote Happy Hour The Ultimate Guide To Unleashing Your Wild Side
Here’s a quick rundown of what we’ll cover:
- The History of Parker House Rolls
- Key Ingredients You’ll Need
- Step-by-Step Guide to Making the Rolls
- Tips for Success
- Delicious Variations to Try
- Frequently Asked Questions
The Story Behind Parker House Rolls
Parker House rolls have a rich history that dates back to the 1800s. These iconic rolls were first created by the Parker House Hotel in Boston, Massachusetts, and they quickly became a hit with guests. The hotel’s chef came up with the idea of folding the dough in half before baking, giving the rolls their signature shape and texture.
Fast forward to today, and Parker House rolls are a staple at holiday dinners, brunches, and family gatherings. They’re versatile, easy to make, and oh-so-delicious. Thanks to Half Baked Harvest, you don’t need to rely on store-bought rolls anymore. With a little effort, you can create bakery-quality rolls that’ll leave everyone wanting more.
Why Are Parker House Rolls So Popular?
There’s something magical about Parker House rolls that makes them stand out from other bread. Here’s why they’re so beloved:
- Buttery flavor that’s hard to resist
- Soft, pillowy texture that melts in your mouth
- Unique folded shape that adds a touch of elegance
- Versatility—they pair well with soups, stews, and main dishes
Now that you know the backstory, let’s move on to the fun part—making them!
Key Ingredients for Half Baked Harvest Parker House Rolls
Before you start baking, it’s important to gather all the ingredients you’ll need. Here’s a list of essentials for making these rolls:
Read also:Vallarta White Glove Transportation The Ultimate Luxury Travel Experience
- All-purpose flour – The backbone of any good bread
- Active dry yeast – This is what helps the dough rise
- Sugar – Adds sweetness and feeds the yeast
- Salt – Enhances the flavor and balances the sweetness
- Unsalted butter – For that rich, buttery taste
- Eggs – Provides structure and richness
- Milk – Creates a soft and tender crumb
Make sure all your ingredients are fresh and at the right temperature. Cold ingredients can slow down the rising process, so let them sit at room temp for a bit before you start.
Where to Buy Quality Ingredients
For the best results, use high-quality ingredients. Here are some tips:
- Buy organic flour if possible—it tends to have better flavor
- Use unsalted butter so you can control the saltiness
- Opt for whole milk over skim milk for a richer taste
Now that you’ve got your ingredients sorted, let’s get to the good stuff—baking!
Step-by-Step Guide to Making Parker House Rolls
This is where the magic happens. Follow these steps carefully, and you’ll end up with rolls that are as good as (or better than) the ones from Half Baked Harvest.
Step 1: Activate the Yeast
Start by warming up the milk and adding a pinch of sugar. Stir in the yeast and let it sit for about 5-10 minutes. You’ll know it’s ready when the mixture starts to foam up. This step is crucial because it ensures the yeast is alive and ready to work its magic.
Step 2: Mix the Dough
In a large mixing bowl, combine the flour, sugar, salt, and melted butter. Gradually add in the milk and yeast mixture, along with the eggs. Mix everything together until you get a smooth, sticky dough. If the dough is too sticky, add a bit more flour—one tablespoon at a time.
Step 3: Knead the Dough
Dust your countertop with flour and transfer the dough onto it. Knead the dough for about 8-10 minutes until it becomes smooth and elastic. Don’t rush this step—it’s what gives the rolls their soft texture.
Step 4: Let It Rise
Place the kneaded dough in a greased bowl, cover it with a damp cloth, and let it rise for about an hour. You’ll know it’s ready when the dough has doubled in size. This step is important because it allows the yeast to do its job and makes the rolls fluffy.
Step 5: Shape the Rolls
Once the dough has risen, punch it down and divide it into equal pieces. Roll each piece into a rectangle, brush with butter, and fold it in half. Place the shaped rolls into a greased baking pan, leaving a bit of space between them.
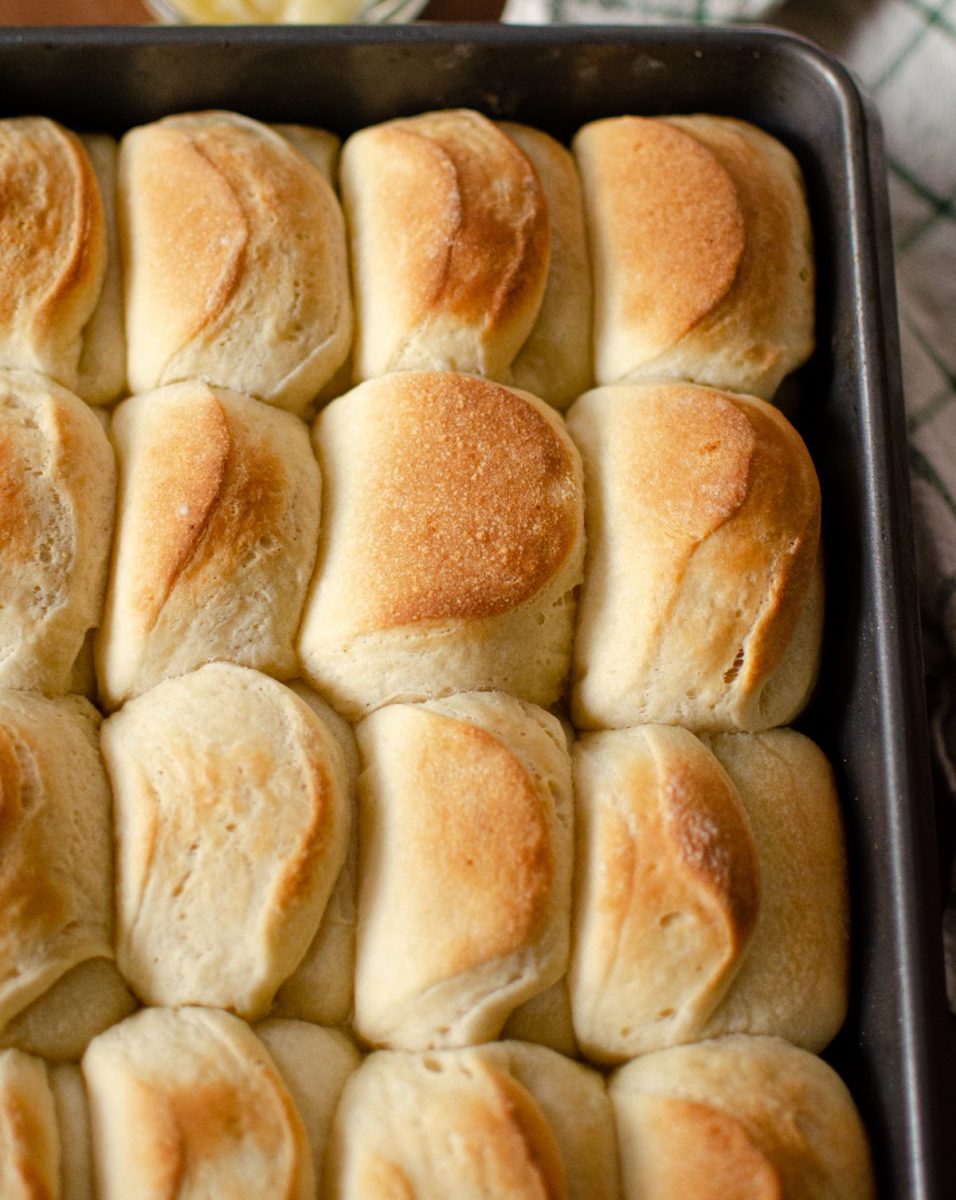
Step 6: Bake to Perfection
Preheat your oven to 375°F (190°C) and bake the rolls for about 15-20 minutes, or until they’re golden brown. Resist the urge to open the oven door too early—it can affect the baking process. Once they’re done, remove them from the oven and let them cool for a few minutes before serving.
And there you have it—soft, buttery Parker House rolls that’ll make everyone go wild!
Tips for Success
Baking can be tricky, but with these tips, you’ll be a pro in no time:
- Use a kitchen scale to measure your ingredients accurately
- Don’t over-knead the dough—it can make the rolls tough
- Keep an eye on the rolls while they’re baking to avoid burning
- Let the rolls cool slightly before serving—they’ll taste even better
These tips might seem small, but they can make a big difference in the final result. Trust us, your rolls will thank you!
Common Mistakes to Avoid
Here are a few mistakes to watch out for:
- Using expired yeast—always check the expiration date
- Not letting the dough rise long enough—patience is key
- Over-baking the rolls—they can dry out quickly
Now that you’ve got the basics down, let’s talk about ways to switch things up.
Delicious Variations to Try
While the classic Parker House rolls are amazing, sometimes you want to mix things up. Here are a few variations to try:
Cinnamon Sugar Rolls
Spread a mixture of cinnamon and sugar on the dough before folding it. This adds a sweet twist that’s perfect for breakfast or dessert.
Garlic Herb Rolls
Mix minced garlic and fresh herbs into the butter before brushing it onto the dough. These savory rolls are great for dinner parties.
Cheese-Stuffed Rolls
Roll the dough around a piece of cheese before folding it. Think cheddar, mozzarella, or even blue cheese for a gourmet touch.
With these variations, you can customize your rolls to suit any occasion or taste preference.
Frequently Asked Questions
Got questions? We’ve got answers. Here are some FAQs about Half Baked Harvest Parker House Rolls:
Can I Freeze the Rolls?
Absolutely! Let the rolls cool completely, then wrap them tightly in plastic wrap and freeze for up to 3 months. To reheat, thaw them overnight in the fridge and warm them in the oven for a few minutes.
Do I Need a Stand Mixer?
Nope! While a stand mixer can make things easier, you can definitely knead the dough by hand. It might take a bit longer, but the results will be just as good.
What Can I Substitute for Milk?
If you’re lactose intolerant or just out of milk, you can substitute it with almond milk, oat milk, or even water. Keep in mind that the flavor might be slightly different.
Conclusion
In conclusion, Half Baked Harvest Parker House Rolls are a game-changer for anyone who loves homemade bread. With their soft texture, buttery flavor, and unique shape, they’re sure to become a staple in your kitchen. By following the steps we’ve outlined and using high-quality ingredients, you’ll be able to create rolls that rival those from the best bakeries.
So what are you waiting for? Grab your apron, roll up your sleeves, and get baking! Don’t forget to share your creations with us in the comments below—we’d love to see how they turned out. And if you’re feeling extra adventurous, try out one of the variations we mentioned. Happy baking, and enjoy every bite!
Article Recommendations